Jupyter Notebooks in VS Code with Interactive Matplotlib Figures and Persistent Sessions

TL;DR: I run a Jupyter Notebook server in a tmux session and configure VS Code to connect to that. I use ipympl to display interactive Matplotlib figures in VS Code.

Persistent Sessions

Generally, VS Code shuts down a Jupyter Kernel when is closed. This might be disadvantageous if it contains costly computations (like training of machine learning models). Then, it should continue to run in the background, even if the user is not connected.

To run a Jupyter notebook server continuously, I use tmux.

VS Code allows to specify a remote (or local) Jupyter Server to connect to when viewing notebooks: Press Ctlr+Shift+P to access the Command Palette and search for “Jupyter: Specify server for connections”:

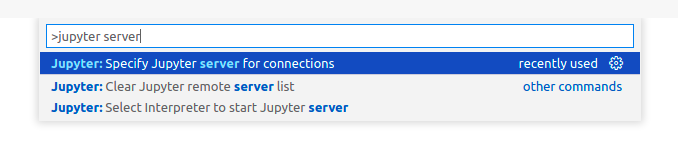
Start the notebook server and copy its URL into the configuration field

$ jupyter notebook --no-browser
    ...
[I 22:07:43.456 NotebookApp] Jupyter Notebook 6.4.0 is running at:
[I 22:07:43.457 NotebookApp] http://localhost:8891/?token=deadbeef
[I 22:07:43.457 NotebookApp]  or http://127.0.0.1:8891/?token=deadbeef
[I 22:07:43.457 NotebookApp] Use Control-C to stop this server and shut down all kernels (twice to skip confirmation).
[C 22:07:43.483 NotebookApp] 
    
    To access the notebook, open this file in a browser:
        file:///.../nbserver-10655-open.html
    Or copy and paste one of these URLs:
        http://localhost:8891/?token=deadbeef
     or http://127.0.0.1:8891/?token=deadbeef

Then, new notebooks will be opened using the configured notebook server.

Interactive Matplotlib Figures

By default, Matplotlib figures are static in VS Code. This can be changed by using the ipympl Matplotlib backend. It can be installed via Conda (conda install -c conda-forge ipympl) and has to be activated using the following cell magic:

%matplotlib widget

References

Compile OpenCV 3.4.4 for Anaconda Python 3.6, 3.7

This guide is based on https://www.scivision.co/anaconda-python-opencv3/. It is targeted at installing a minimal OpenCV 3.4.4 in an Anaconda environment with Python 3.6 or 3.7. I assume you already use conda.

Create an environment

Create an environment and activate it. Make sure you install all packages that you will need later (e.g. scikit-image).
conda create -n my-env python=3.7 numpy
conda activate my-env

Get OpenCV

git clone https://github.com/opencv/opencv.git
cd opencv
git checkout tags/3.4.4

Configure CMake

mkdir release-myenv
cd release-myenv
cmake -DBUILD_TIFF=ON -DBUILD_opencv_java=OFF -DWITH_CUDA=OFF -DWITH_OPENGL=ON -DWITH_OPENCL=OFF -DWITH_IPP=OFF -DWITH_TBB=OFF -DWITH_EIGEN=OFF -DWITH_V4L=OFF -DWITH_VTK=OFF -DBUILD_TESTS=OFF -DBUILD_PERF_TESTS=OFF -DCMAKE_BUILD_TYPE=RELEASE -DBUILD_opencv_python3=yes -DCMAKE_INSTALL_PREFIX=$(python -c "import sys; print(sys.prefix)") -DPYTHON3_EXECUTABLE=$(which python) -DPYTHON3_INCLUDE_DIR=$(python -c "from distutils.sysconfig import get_python_inc; print(get_python_inc())") -DPYTHON3_PACKAGES_PATH=$(python -c "from distutils.sysconfig import get_python_lib; print(get_python_lib())") ..

Build & Install

make -j -l 4
make install

Test OpenCV

# Output should be empty
python -c "import cv2"
For a more advanced test, use the example in the article mentioned at the beginning: https://www.scivision.co/anaconda-python-opencv3/#2-test-opencv

Problems

If the package is not importable, you may have to copy over the .so file to the correct location (e.g. <path/to/anaconda>/envs/<env>/lib/python3.7/site-packages).